Easy Onion Soup Meatloaf (Old-School Flavor, No Fuss)
Published by [email protected] on
Table of Contents
ToggleEasy Onion Soup Meatloaf (Old-School Flavor, No Fuss)
Let’s get cozy with a classic dinner recipe that feels like a warm hug. This crowd-pleasing dish combines pantry staples with a nostalgic twist, delivering big flavor without complicated steps. Whether you’re new to cooking or a kitchen veteran, you’ll love how effortlessly it comes together.
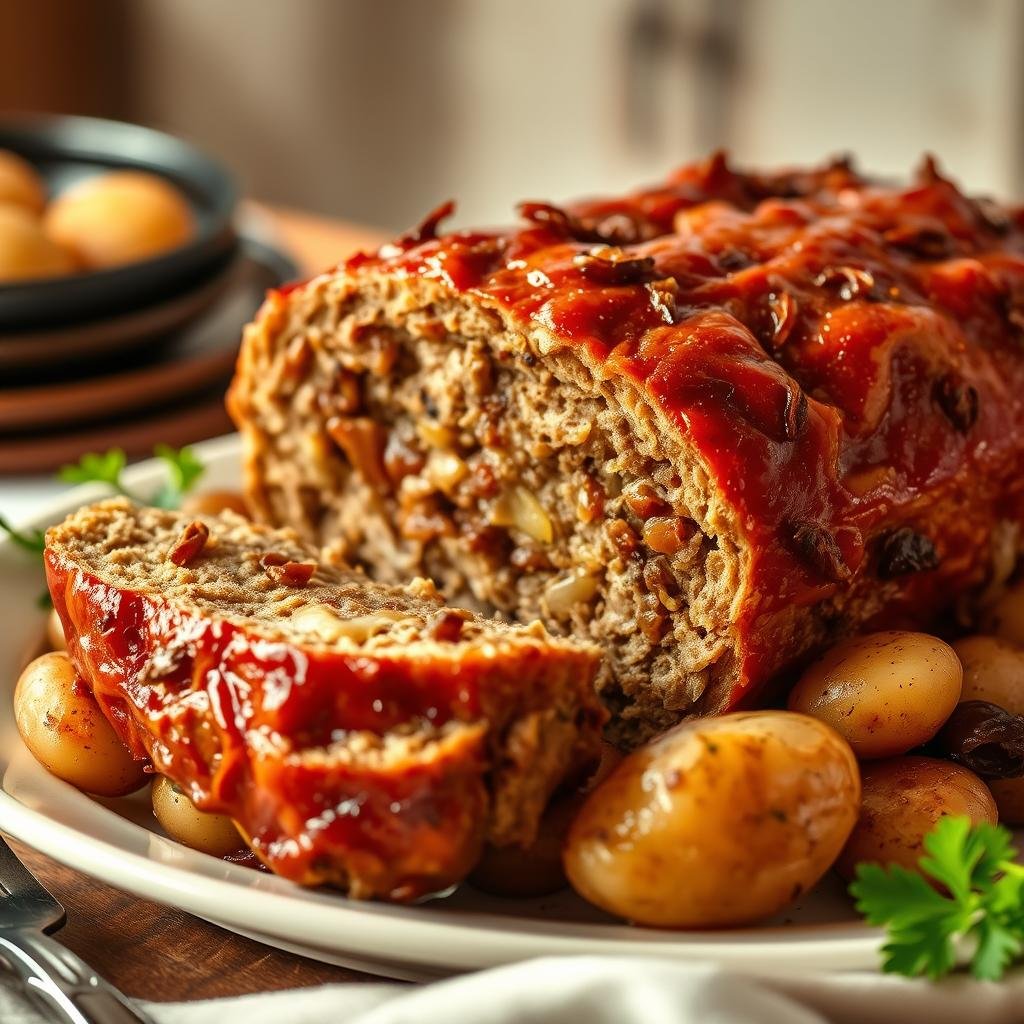
The magic starts with a trusty packet of Lipton’s signature seasoning – the secret ingredient that adds depth to every bite. Mixed with ground beef and pork, it creates a juicy texture that stays moist even after baking. No dry, crumbly results here!
This family favorite shines on busy weeknights but feels special enough for Sunday suppers. You’ll need just 10 minutes of prep before popping it in the oven. While it cooks, you’re free to tackle homework, fold laundry, or simply relax with a glass of wine.
What makes this version stand out? Consistent perfection. The balanced blend of savory spices and tender meat works every single time. Serve it with mashed potatoes or roasted veggies for a meal that’ll have everyone asking for seconds.
Recipe Overview and Inspiration
Back in the 1950s, American kitchens welcomed a game-changing shortcut: Lipton’s iconic seasoning blend. Busy homemakers embraced its savory punch, transforming simple dishes into flavor-packed favorites. This clever hack became the backbone of the legendary “Souperior Meatloaf” – a recipe still loved decades later.
Why does this meatloaf recipe outshine others? The magic lies in its balanced duo of ground meats and that umami-rich lipton onion soup mix. Beef brings hearty richness, while pork keeps every bite juicy. Combined with the mix’s dehydrated onions and herbs, it creates a symphony of savory notes that basic versions lack.
What makes it timeless? Effortless reliability. Families appreciate how the dish delivers homemade warmth without hours of prep. As it bakes, the top caramelizes into a glossy crust that crackles slightly when sliced – revealing tender, steam-kissed layers underneath.
This isn’t just nostalgia talking. Generations keep returning because the formula works. Whether served at Wednesday dinners or potluck gatherings, it consistently satisfies cravings for comforting, no-fuss meals. Proof that great taste never goes out of style.
Essential Ingredients for Onion Soup Meatloaf
Great flavor starts with the right components. Your star player? 80/20 ground chuck – the ideal balance of lean meat and fat. This ratio keeps your dish juicy without greasiness. Combine it with the savory punch of Lipton’s signature seasoning envelope, which delivers concentrated onion and herb flavors.
Binding agents matter. Large eggs and plain breadcrumbs work together to create structure. Avoid panko – its crunch overpowers the tender texture. Milk softens the crumbs, while chopped yellow onions add subtle sweetness.
- Tangy boosters: Ketchup and Worcestershire sauce add brightness
- Glaze magic: Brown sugar + vinegar creates sticky caramelization
- Optional upgrade: Garlic powder enhances without dominating
Find the seasoning mix in most grocery stores’ soup aisle. Look for the iconic yellow box labeled “Recipe Secrets.” For best results, use fresh breadcrumbs from day-old bread – they absorb moisture better than store-bought versions.
The glaze transforms good into mouthwatering greatness. Its sweet-sour balance comes from ketchup, brown sugar, and vinegar. A dash of onion powder reinforces the main flavor profile. Brush it on during the last 15 minutes for glossy, crackly perfection.
Preparation and Mixing Techniques
Mastering the mixing process makes all the difference. Start by cracking two large eggs into your bowl – beat them thoroughly before adding other ingredients. This creates a smooth base that coats every bit of ground meat evenly, preventing clumps.
Roll up your sleeves and dive in with clean hands. While utensils seem easier, fingers let you feel the texture. Gently fold the mixture until it just starts clinging together – like forming a snowball that barely holds its shape. Overdoing it activates proteins that make results rubbery.
Watch for these signs of perfect blending:
- No visible streaks of egg or breadcrumbs
- Ingredients hold together when lifted
- Surface looks slightly tacky but not sticky
Shape the mixture into a 2-inch tall loaf on parchment paper. This height ensures even cooking without drying edges. Prefer crispy sides? Skip the paper and grease your pan lightly – the direct contact creates a golden crust.
Remember: preheat your oven while prepping. A hot start seals juices fast, keeping every bite moist. Now step back – your masterpiece’s ready for baking!
Step-by-Step Cooking Process
Perfecting your dish requires timing as precise as your favorite playlist. Start by preheating your oven to 350°F – this crucial step ensures even heat distribution from the first minute. Place your shaped mixture on a parchment-lined pan, then slide it into the center rack. Set a timer for 45 minutes and resist the urge to peek!
When the alarm sounds, pull the pan out carefully. Use a spoon to spread the glaze evenly across the top, coating every inch. This two-stage baking method lets the exterior develop a caramelized crust without burning the sweet topping. Return it to the oven for 15-20 more minutes – that’s when the magic happens.
Watch for these doneness clues:
- Internal temperature hits 160°F on a meat thermometer
- Glaze bubbles and turns sticky-shiny
- Edges pull slightly from the pan
Ovens vary, so adjust if needed. If the top darkens too fast, tent foil over it. For cooler appliances, add 5-10 minutes to each phase. Total time typically ranges from 1 hour to 1 hour 20 minutes. Let it rest 10 minutes before slicing – patience rewards you with juicy layers!
Ensuring a Moist and Flavorful Meatloaf
Achieving a perfectly moist meatloaf isn’t luck—it’s all about technique. Your two best tools? A trusty meat thermometer and patience during the resting phase. These steps ensure every slice stays juicy from edge to center.
Why does resting matter? Heat pushes juices toward the center while cooking. Letting the loaf sit 5-10 minutes allows liquids to redistribute evenly. Skip this step, and you’ll watch precious moisture escape when slicing.
Follow these pro tips for success:
- Insert your meat thermometer into the thickest part—160°F means done without overbaking
- Tent foil loosely over the meat to keep heat without steaming the crust
- Use a sharp knife and gentle sawing motion for clean cuts
For extra insurance against dryness, place a water-filled pan on the oven’s lower rack. Steam creates a humid environment that keeps meat tender. Watch for golden-brown glaze and slight shrinkage from pan edges—these visual cues signal it’s time to rest.
Variations and Substitutions to Consider
Transform your classic dish with creative twists that keep things fresh. Whether you’re adapting for dietary needs or just craving something new, these simple swaps deliver big flavor without losing that signature comfort.
Leaner proteins like ground turkey or chicken work beautifully here. They cut fat content while soaking up the savory seasoning blend. For gluten-free options, try oatmeal instead of breadcrumbs – it adds a pleasant chew and extra fiber.
Customize your seasoning with this easy homemade mix:
- 2 tbsp dried minced onions
- 1 tsp onion powder
- ½ tsp garlic powder
- ¼ tsp black pepper
Boost texture and taste with mix-ins. Shredded cheddar or Parmesan cheese creates gooey pockets, while diced mushrooms add earthy depth. For smoky notes, swap ketchup glaze with barbecue sauce spiked with brown sugar.
Dietary adjustments? No problem:
- Use almond flour instead of bread products for keto-friendly versions
- Replace eggs with flaxseed gel for binding
- Opt for low-sodium broth in homemade seasoning
These tweaks let everyone enjoy that nostalgic flavor while making the soup meatloaf recipe uniquely yours. Experiment with herbs like thyme or rosemary for seasonal twists!
Serving and Side Dish Pairings
The right accompaniments turn a great main dish into an unforgettable meal. Classic mashed potatoes remain the ultimate partner, their creamy texture balancing the savory richness. Roasted carrots or garlicky green beans add color and crunch, while crusty bread soaks up every drop of glaze.
Modern twists keep things exciting. Try these crowd-pleasing upgrades:
- Potatoes reimagined: Swap standard mash for crispy parmesan wedges or loaded twice-baked versions
- Roasted seasonal veggies tossed with balsamic and thyme
- Quinoa pilaf studded with dried cranberries for sweet contrast
For dinner parties, arrange slices on a platter with herb sprigs and caramelized shallots. Let it rest 10 minutes slicing – this ensures neat portions that hold their shape. Serve sides in mismatched bowls for rustic charm.
Leftovers shine in new roles. Stack cold slices on sourdough with melted provolone and tangy BBQ sauce. Morning-after breakfast hash? Cube leftovers, pan-fry with diced onions, and top with fried eggs.
Plan portions wisely: A standard loaf serves 6-8 adults. For smaller families, freeze half before baking. Pair with bold red wines like Zinfandel or fruity iced tea for non-alcoholic refreshment.
Storing and Reheating Best Practices
Keep your leftovers tasting fresh with smart storage solutions. Cool your soup meatloaf completely before transferring to an airtight container. This prevents condensation from making the crust soggy. Refrigerate within two hours of cooking for optimal safety.
For whole loaves, wrap tightly in plastic before placing in your airtight container. This double layer locks in moisture while keeping fridge odors out. Sliced portions? Layer them between parchment paper to prevent sticking.
Freezing works beautifully for meal prep. Wrap individual slices in foil, then seal in freezer bags. Label with dates – they’ll stay tasty for three months. Thaw overnight in the fridge when ready to enjoy.
Reheating tricks make all the difference. Use your oven for crispy edges: Cover the loaf with foil at 325°F until heated through. Microwave users – place a damp paper towel underneath to keep it juicy. Either method brings back that just-baked goodness!
Remember: Proper storage lets your onion soup meatloaf shine as leftovers. These simple steps ensure every reheated bite stays flavorful and safe – no dry disappointments here!
FAQ
Can I substitute the soup mix with fresh onions?
Absolutely! Use ½ cup of finely chopped caramelized onions and add a pinch of garlic powder for a similar savory kick.
How do I keep the loaf from falling apart?
Let it rest for 10–15 minutes after baking. This allows the juices to settle, making slicing easier. Using bread crumbs or oats also helps bind the mixture.
Can I use a different protein instead of ground beef?
Yes! Ground turkey, chicken, or plant-based alternatives work. Adjust cooking times slightly, as leaner meats cook faster.
What’s the secret to avoiding a dry texture?
Don’t overmix the meat, and use a meat thermometer. Pull it out when the internal temperature hits 160°F. A foil tent during baking locks in moisture too!
Can I prep this dish ahead of time?
Sure! Assemble the loaf, wrap it tightly, and refrigerate for up to 24 hours before baking. Add 5–10 extra minutes to the cook time if it’s cold from the fridge.
What sides pair best with this recipe?
Classic pairings include garlic mashed potatoes, roasted veggies, or a crisp green salad. A drizzle of tangy glaze adds extra flair!
How long can I store leftovers?
Keep slices in an airtight container for 3–4 days. Reheat in the oven or microwave with a splash of broth to maintain juiciness.


0 Comments